
A practical guide · Updated October 2026
How to add screenshots to a bug report on a Mac.
Take one screenshot per step, point at what went wrong, and put each one in the report under its step, with the expected and actual results typed as text. On a Mac you can do it for free with the built-in screenshot keys and Markup, or send every step as one numbered image with SnapTrellis.
Quick answer: Put one screenshot of each step under that step in the GitHub issue, Jira ticket, Linear issue, or email: ⌃⇧⌘4 copies a screenshot, ready to paste with ⌘V, and a saved screenshot can be dragged in. Hide private details first, and type the expected and actual results as text. SnapTrellis can copy all the steps as one numbered image.
- What to include
- The free way
- Hide private details
- One numbered image
- GitHub, Jira, Linear, email
- Common questions
What a good bug report includes
- A title that names the problem, like “Export to PDF does nothing.”
- Steps to reproduce, numbered, one action each, with a screenshot of each step.
- Expected and actual results: “Expected: a PDF downloads. Actual: the spinner never stops.”
- Versions: the app’s, and your macOS version from Apple menu → About This Mac.
- Nothing private: no names, email addresses, or account numbers.
1. The free way: screenshot keys and Markup
Free and built in. Fine for two or three steps.
- Type the steps into the report first.
- At each step, press ⌃⇧⌘4 and drag over the part that matters; with Control, it’s copied instead of saved. Click under the step and press ⌘V.
- To point at the problem, take that one with ⌘⇧4 instead, click the thumbnail, and draw a box or an arrow with Markup’s Shapes. Click Done, then drag the saved file into the report.
Hide private details before you paste
Everyone who can open the ticket sees the screenshot; on a public GitHub repository, that’s anyone.
- Free: take that step with ⌘⇧4 and click its thumbnail, as in step 3 above. Markup has no blur, so cover private text with a rectangle from Shapes, with Fill Color and Border Color set to black. Here’s how to hide part of a screenshot safely.
- SnapTrellis: press X to hide with a solid box, or B to blur. Use Hide for email addresses, passwords, and numbers.
- Check the whole screenshot: browser tabs, notifications, and the account name in a corner often show names and addresses.
SnapTrellis copies each capture right away; when you blur or hide, it replaces that copy with the edited one, unless you’ve copied something else since.
2. Every step in one image: SnapTrellis
Free for 14 days, then $19.99 once. Best for bugs with several steps.
- Choose File → New Group… and name it after the bug, like “Bug: Export to PDF does nothing.” The name becomes the image’s title.
- Reproduce the bug, pressing ⌥⇧4 and dragging at each step; ⌥⇧R captures the same area again without dragging. Click the card, type the step, like “Choose PDF,” and press Return.
- Click Mark Up on the card instead of pressing Return (it keeps your step), or click the screenshot in the Trellis. Press R to box what you clicked and X to hide an email address. Press M and click the problem, then type its note, like the expected and actual results.
- Press ⌥⇧C to copy the group as one image, and paste it into the report.
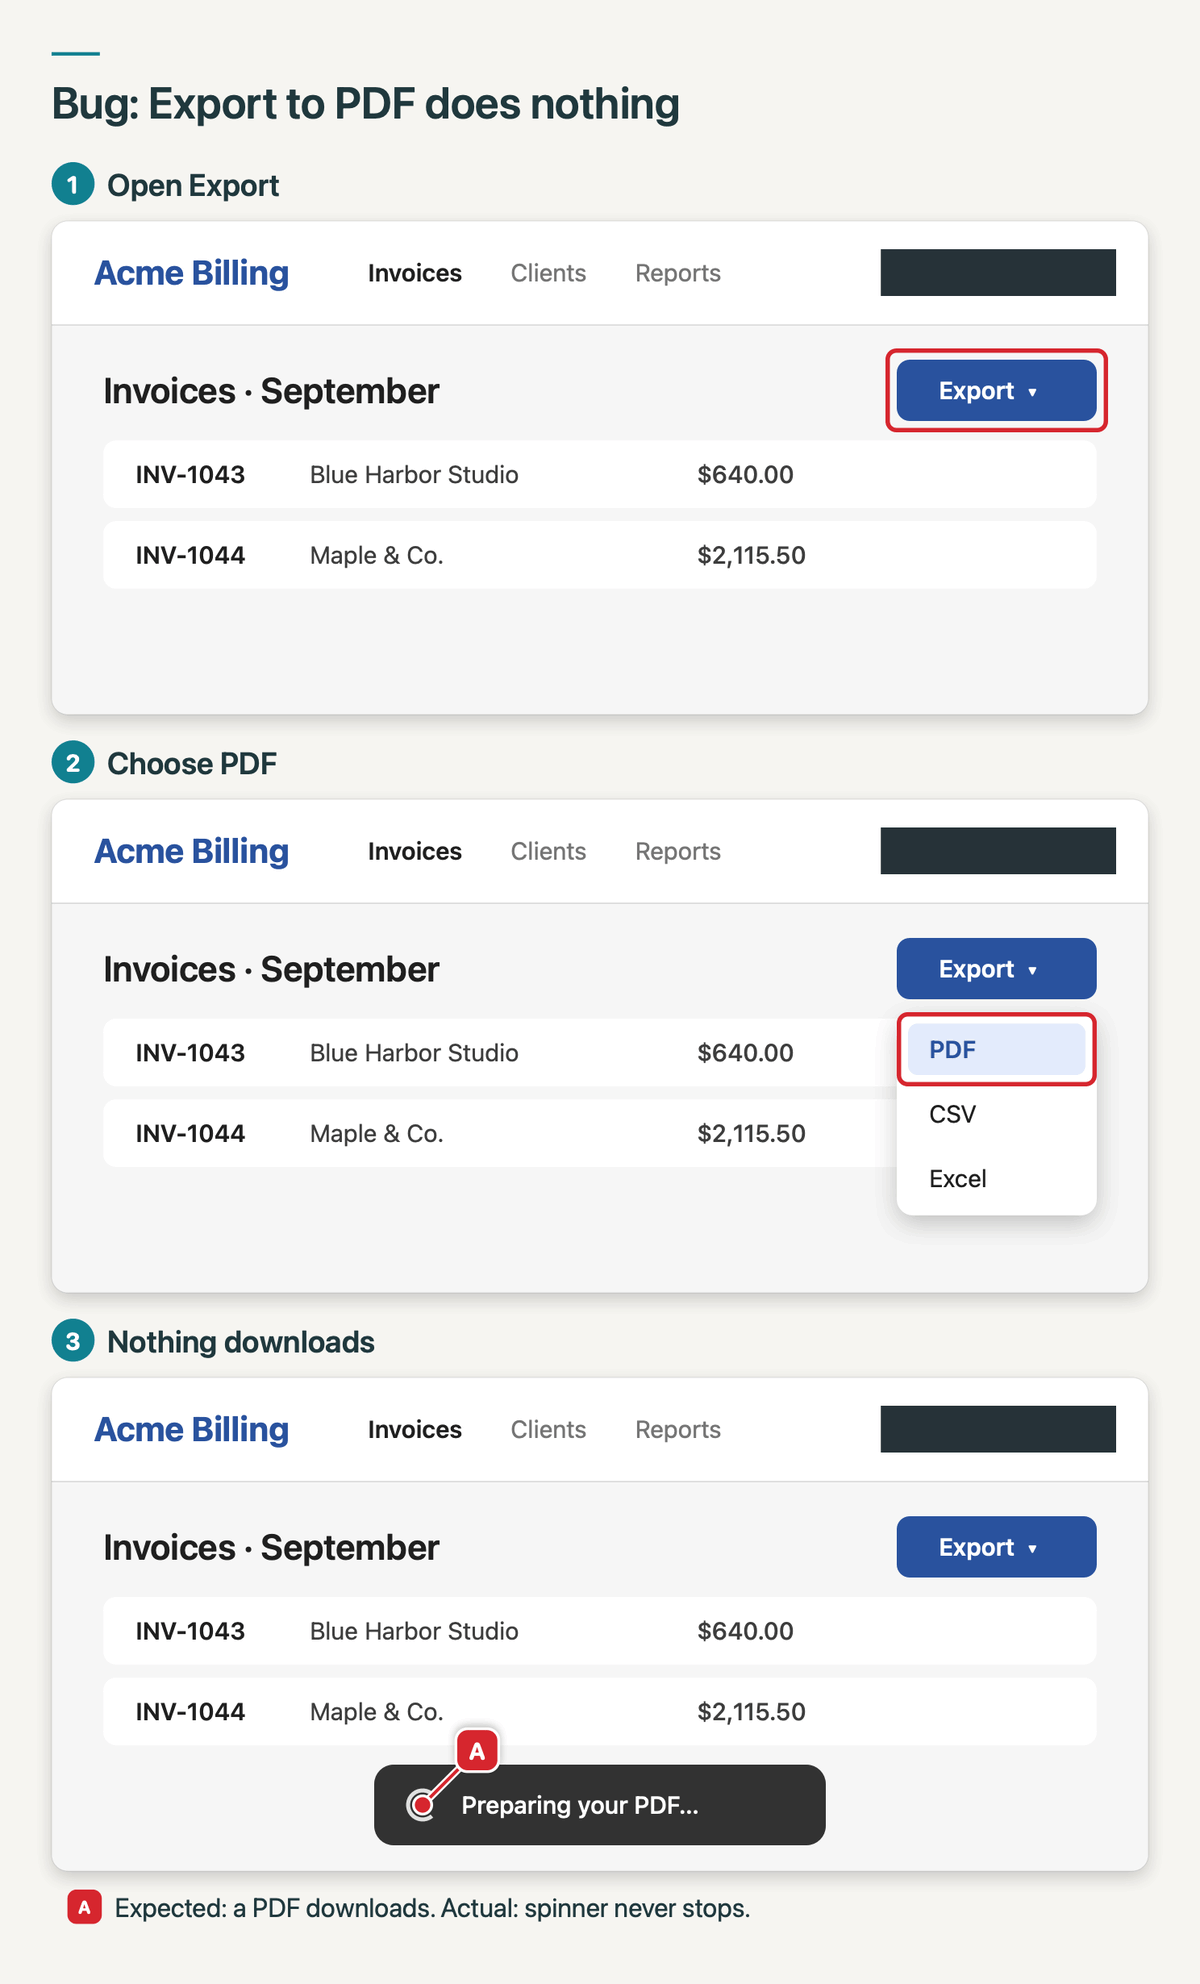
What it doesn’t do: it doesn’t record clicks or make videos. Markers inside a screenshot are letters, not numbers. Merging needs the free trial or the unlock; capturing, Hide, Blur, and markers are always free. More on adding numbers and labels to screenshots.
Paste it into GitHub, Jira, Linear, or email
- GitHub: click in the issue’s description or comment box and press ⌘V. GitHub uploads the image and puts a link to it in your text.
- Jira and Linear: drag the image into the description or a comment, or attach it; pasting with ⌘V often works too. From SnapTrellis, drag it out of its Preview window, or use Save as One Image… (the arrow beside Merge).
- Email: click in the message and press ⌘V.
Keep the words in the text. Type the steps, error messages, versions, and results into the report, and let the image show them: text inside a picture is hard to search, copy, or read with a screen reader.
Common questions
How do I add a screenshot to a GitHub issue?
Copy the screenshot (press ⌃⇧⌘4, or ⌥⇧C for a SnapTrellis group), click in the issue’s description or comment box, and press ⌘V. You can also drag an image file into the box. GitHub accepts PNG, GIF, JPEG, and SVG images.
Should a bug report have screenshots or a video?
Screenshots show each step clearly and are quick to read. A video is better when the bug is about motion or timing: press ⌘⇧5 and choose a record option. Either way, type the steps and the expected and actual results as text.
Writing instructions instead of a bug report? See how to make step-by-step instructions with screenshots.
Free to download. Capturing, Hide, Blur, and markers are always included; merging a group is free for 14 days, then $19.99 once. No subscription. macOS 14 or later.