
A practical guide · Updated October 2026
How to add numbers and labels to screenshots on a Mac.
To add a number to a screenshot on a Mac for free, open it in Markup, type the number with the Text tool, and drag it into place; a short line of text beside it is its label. To number and label several screenshots at once, SnapTrellis puts a number and your label on each and copies them as one image.
Quick answer: For free, open the screenshot in Markup (click its thumbnail, or use Preview), type a number with the Text tool, and type a short label beside it; a circle from Shapes makes the number stand out. For several screenshots, SnapTrellis numbers each one, adds your label, and copies them as one image with ⌥⇧C.
- The free way
- A visible caption
- Several, with captions
- One numbered image
- Step recorders
- Common questions
1. The free way: Markup shapes and text
Free and built in. Fine for a screenshot or two.
- Click the screenshot’s thumbnail right after you take it. For one you saved earlier, open it in Preview and click the Show Markup Toolbar button (⇧⌘A).
- For a numbered circle, click Shapes, choose the oval, and drag it next to the spot. Set Fill Color to a strong color.
- Click Text, type the number, and drag it onto the circle. Text Style sets the size and color; white on a dark circle reads well.
- Add the label the same way: one short line, like “Click Settings.”
- Click Done, or choose File → Save in Preview.
Apple notes that saved marks can’t be moved or removed, so mark up a copy (File → Duplicate) if you’ll need the clean one. It’s free and precise, but each number takes several clicks.
How to add a caption people can see
Type it on the picture with Markup’s Text tool. A caption added in Photos (Info window, Add a Caption) is different: it’s stored with the photo to help you search, not drawn on it, so it won’t show on the picture you send.
How to combine screenshots with captions into one image
For free, caption each one in Markup, then join them with the Shortcuts app’s Combine Images action (here’s how), which adds no numbers or captions of its own. Or put them on one Keynote slide with a text box under each, and choose File → Export To → Images.
2. Numbers and labels as you capture: SnapTrellis
Free for 14 days, then $19.99 once. Best when you often send a few screenshots together.
- Choose File → New Group… and name it after the task, like “How to turn on email alerts.” The name becomes the title on top.
- Press ⌥⇧4 and drag over the first step. Click the card beside it, type the label, like “Open Settings,” and press Return. Missed the card? Choose File → Label Last Screenshot…
- To show where to click, click Mark Up on the card instead of pressing Return (it keeps your label), or click the screenshot in the Trellis. Press M and click the button. A lettered marker appears; type a note if the step needs one.
- Repeat for each step, then press ⌥⇧C and paste. Each screenshot gets a big number and its label, with marker notes listed underneath.
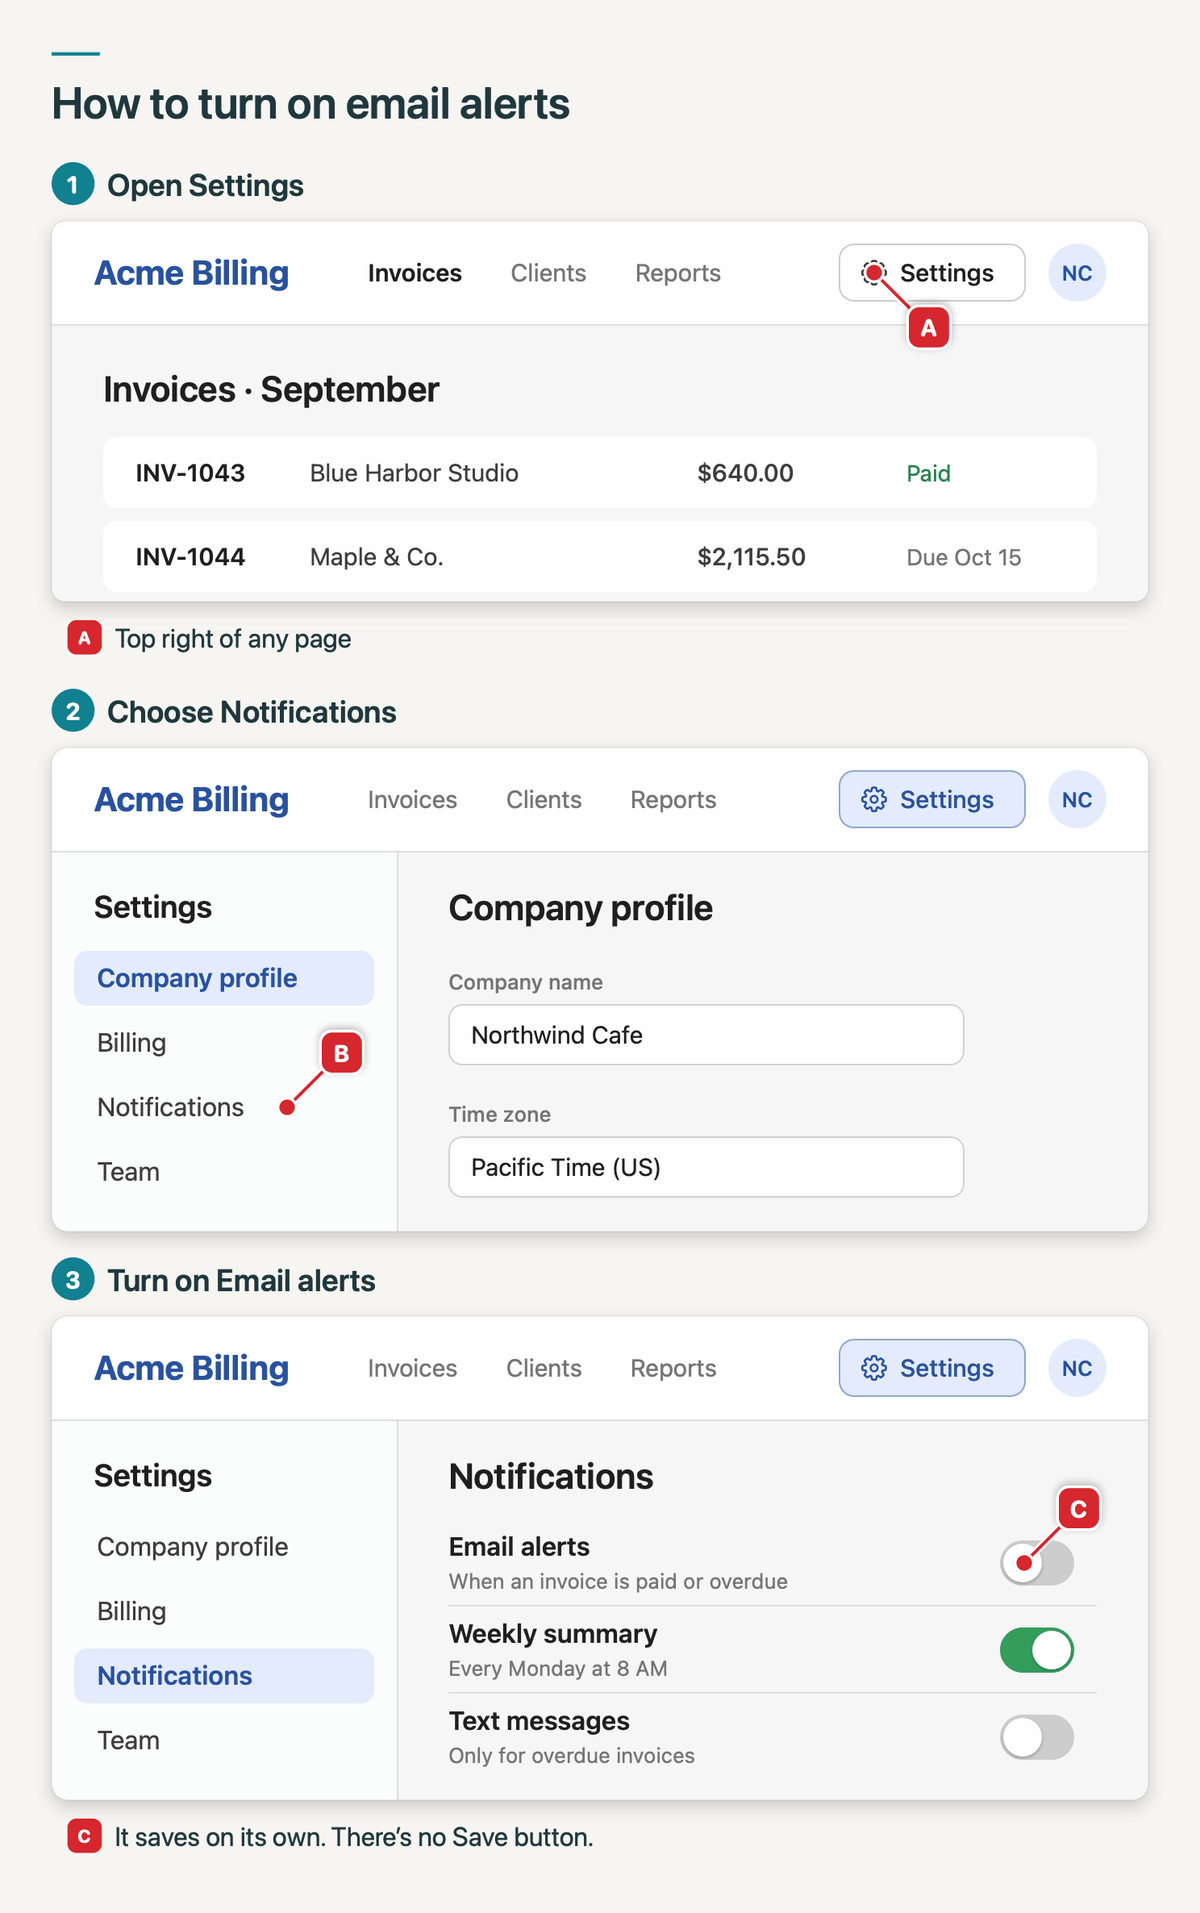
What it doesn’t do: markers inside a screenshot are letters, not numbers, so numbers always mean screenshots. Merging a group into one image needs the free trial or the unlock; capturing, labels, and markers are always free. And it doesn’t record your clicks.
Numbered steps without a Steps Recorder
Windows has Steps Recorder built in, though Microsoft is retiring it; macOS has nothing like it. On a Mac, add the numbers yourself, as above, or use a recorder app such as Folge, Scribe, or Tango, which takes a screenshot at each click (step recorders, compared).
Common questions
How do I add numbers to screenshots on a Mac?
Open it in Markup (click its thumbnail, or press ⇧⌘A in Preview), click Text, type the number, and drag it into place; a circle from Shapes, added first so it sits behind the number, helps it stand out. SnapTrellis numbers every screenshot in a group when it copies them as one image.
Is there a Mac app that combines screenshots into one image with numbers and labels?
Yes. SnapTrellis, on the Mac App Store, copies a group of screenshots as one image with a title, a number and label on each screenshot, and marker notes underneath; it’s free for 14 days, then $19.99 once. Snagit, a paid app, has templates that turn screenshots into a step-by-step guide. Shortcuts, which is free, joins screenshots without numbers or labels.
How do I add numbered steps to a screenshot?
Inside one screenshot, type the numbers with Markup’s Text tool, one beside each spot. Snagit, a paid app, has a step tool that adds numbered markers as you click. SnapTrellis numbers screenshots, not spots, so give each step its own screenshot.
Writing a longer how-to? See how to make step-by-step instructions with screenshots. Reporting a bug? See how to add screenshots to a bug report on a Mac.
Free to download. Capturing, labels, and markers are always included; merging a group is free for 14 days, then $19.99 once. No subscription. macOS 14 or later.